Brakes

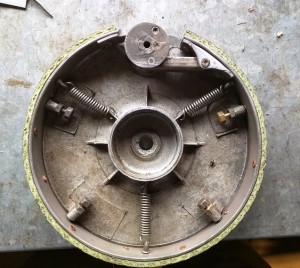
By 1928 most cars and motorcycles had front brakes, even Ford had them, but there was still room for variety in the method.  My 600 cc Douglas is a lovely 1928 motorcycle, very smooth, effortless cruising, good handling….really crappy brakes, here is a photo of the terrible idea that is a vintage Douglas brake.
IMG_20150520_154054

Yes it is an expanding band brake and on top of that it is reversed so no servo action, earlier models at least had the servo action but they must have worked too well (or maybe locked) hence the brake in the photo.  You may notice the nice new “green Gripper” linings, they did not improve things, with the brakes on fully I could still (with some effort) turn the wheel by hand, when riding there was no discernible retardation.

Some will say you should not fiddle, that they should be left original, if we still had “original ” traffic that would be OK. I would rather live to enjoy it, so to  the next photo:

IMG_20150520_150248

First off I bought another backing plate and put the original one in a safer place than the front forks of the Douglas.  As it happens 1950/60s Triumphs had 8″ drum brake shoes so I milled down some of those and waded my way through Ebay and found a Royal Enfield (Famous Indian Brand) cam and lever then managed to bugger about the workshop for 3 days making it OEM 1928 Douglas.  Test ride to follow when it stops raining.

Lastly how many Famous Graffitists can you name from this great piece of motoring history hidden away in inner Melbourne?

IMG_20150517_141417 IMG_20150517_141356

IMG_20150517_141402 IMG_20150517_141422


Tech for old vehicles

This week I at last received the magneto back for the 1928 Douglas, it has been rewound, remagnetised and repainted so I went about refitting it and of course had forgotten how the re-engage the gears so had to go back to first principles, well really.

Being a horizontally opposed twin there is a bang every half magneto revolution so first off must find which plug is firing, usually this involves electrocuting yourself but as I am a chicken I do it differently.  I have an electronic magneto buzzer, it was designed to time aircraft so can do two magnetos but does one nicely, a byproduct is that when the points open the appropriate hi-tension lead tingles (tech term for mild electric shock) so not only tells you the points have just opened but which plug is firing.  So having already stuck my thumb over a plug hole to find out which one was on compression and lined up the file mark on the flywheel the rest was pretty simple.  These timers are available on the net, the one I use is from http://www.brewingtontech.com/ but now only available as a kit however these ones looks good http://www.skygeek.com/magneto-timing.html and shipping to Australia is only $15 USD they have single and duel magneto models with and without sound (you want sound).

20150124_162121_resize_20150124_162238

While on the subject of useful stuff.  I use an electronic inclinometer rather than a degree wheel (see picture below) these are about $32.00 AUD on ebay and as they are magnetic they stick anywhere to the rim of the flywheel, when at TDC hit the zero button and move the flywheel and the box is giving you a direct measurement of angle, works great for engines with no timing marks.

20150123_171005_resize_20150124_162238


Lastly I had a tip from Colin a friend of mine who had to make some gaskets for an overdrive unit.  He just put the part, mating surface down on his scanner and printed out the scanned image, he used thin gasket paper in his printer then just cutout the picture, you probably should scan and print a ruler first and check that it prints to scale.  A photocopier may be OK as well but I take no responsibility for what the gasket paper might do to it!

Cheers

Mark